How to make SPSS produce all tables in APA format automatically!
Formatting a graph that was exported from SPSS to Microsoft Word can be an absolute pain. Since neither program is known "user-friendliness", the interaction between the two can be predictably tedious and frustrating. The process of converting a standard SPSS table to APA format can become overwhelming when you have an entire manuscript worth of tables. Fortunately, a few minor alterations to your SPSS settings can make SPSS do most of the heavily lifting for you, making SPSS automatically produce tables that closely resemble APA format and cutting down your formatting time by as much as 90%!
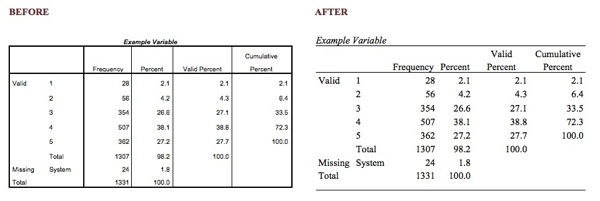
APA Format Table Example Before and After
Pictured (above) are examples of standard SPSS tables (left) and tables produced in SPSS after a few adjustments (right) to the settings. The table on the right more closely aligns with APA format than the table on the left in several ways:
- The title has been changed from center justified and bold to left justified, italics, and NOT bold ([1] above-right; APA format).
- The table borders have been adjusted appropriately (details of specific changes to follow shortly).
- The default font type and size has been changed to Times New Roman 12pt.
The adjustments to SPSS that are needed to produce tables like the ones on the right are only necessary to be made once, after which the adjustments are made automatically by SPSS and you'll find all of your future tables are ready for insertion into your APA manuscript immediately after analysis. The necessary changes can be accomplished in 3 steps:
- Produce an initial table for alteration (using any analysis; a simple frequency table is sufficient).
- Create a custom "Table Look Style", by "Editing" the initial table's "Look Style" and saving the changes as a custom "style" ("APA Table" seems like a reasonable choice).
- Adjust your SPSS settings (options) so that SPSS recognizes your newly created "Look Style" as the default table "Look Style".
From there, you can simply run your analyses as you typically would and your tables should be formatted in APA format. Let's get into the specifics about how to accomplish these three steps...
1) PRODUCE INITIAL TABLE
The first step to make your SPSS adjustment is to produce an initial table for editing. For our purposes, a simple frequency does the trick (in the SPSS drop-down menus, navigate to: Analyze>descriptives>frequencies). Once your table is produced (
below
), right click on the table and click on "Edit Content" and then either "In Viewer" or "In Separate Window" (it doesn't really matter which you choose, for our purposes).

SPSS Edit Content Menu
Once your table is in "editing" mode (below), right click again and click on "TableLooks..."

Next, the "TableLooks" screen (below) should pop-up.

Under "TableLooks Files:", change the selection "CompactAcademicTimesRoman" ([1]below).

While simply making that switch gets us a lot closer to APA format than the "default" SPSS table, we can improve the settings to get us much closer with a few additional changes.
NOTE: "CompactAcademicTimesRoman" is the closest "TableLook" to APA on its own, but luckily we can alter its attributes and save the changes!
Once you've clicked on "CompactAcademicTimesRoman", click on the "Edit Look..." button ([2] above). After clicking on "Edit Look...", the "Table Properties" screen should pop-up (below).

Within the "Table Properties" screen, we are going to adjust elements of both the "Cell Formats" tab (above) and the "Borders" tab ([1] below).
First, the "Cell Formats" tab (above):
On the "Cell Formats" screen, you are able to adjust: the tables "Text" (font), the "Alignment" (justifications) of the text, the background color (which we will not be adjusting), and the "Inner Margins". We will only be changing the "Text" and "Alignment" settings. We'll deal with the "Text" first.
The default of all text in SPSS tables is 8 pt ([4] above), while the appropriate APA format font is 12 point, so the first thing we'll need to to is change all of the text in the table from 8 pt ([4] above) to 12 pt.
- Unfortunately, you are required to change each text element separately by either clicking on the element in the "Sample" table on the right side of the screen ([1] above), or by selecting different elements in the "Area" drop-down menu ([2] above).
For example
, click on the "
Table Title
" (
[3]
above
)
in the "Sample" table to edit that element. After clicking on the element, simply adjust the attributes on the left side of th screen
NOTE
: to comply with APA format for table titles, change your font size from 8 pt. to 12 pt. (
[4]
above
), make it italics and not bold (
[5]
above)
, and click on "Left Alignment" (
[6]
above
]
)
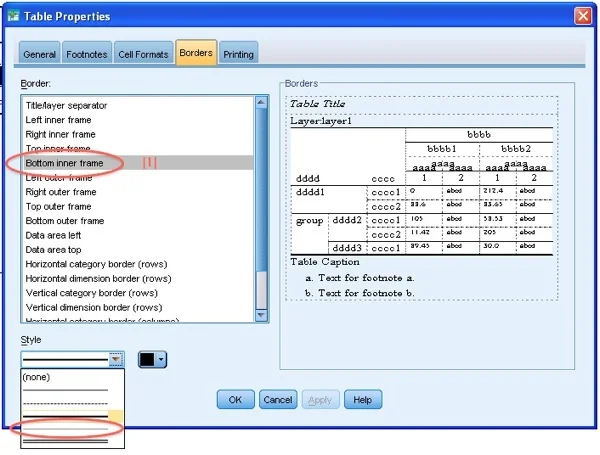
Next, switch to the "Borders" tab ([1] below).

Once in the "Borders" tab, there are three elements that we are going to adjust:
- Top inner frame ([2] above)
- Bottom inner frame
- Data area top
To adjust the "Top inner frame", highlight it in the Border menu section (
[1] below
). Next, click on the "Style" drop-down menu (
[2] below
) and change the style from the double line (not APA format) to the single thin line (
[3] below
; second from the bottom; complies with APA format).

Next, repeat the style adjustment for the "Bottom inner frame" ([1] below).
Again, repeat the style adjustment for the "Data area top" ([1] below).

Next, click the "Apply" button ([2] above), followed by the "OK" button ([3] above).
2) CREATE CUSTOM TABLE LOOK STYLE
After clicking the "OK" button, you should find yourself back at the "TableLooks" screen ([1] below). On this screen click on "Save As" ([2] below).

In the "Save As" dialogue screen (below), give your newly create table "Look" a name, preferably something self-explanatory and easy to remember. As you can see, I choose to call it "APA Table"([1] below).
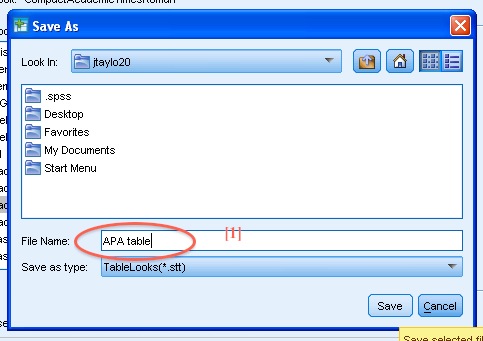
Before clicking "Save", make sure you are saving the "TableLook" file in the correct directory:
On a mac
, the "Looks" directory can be found in the "SPSS" folder (or PASWStatistics folder;
[1] below
) within "Applications" (
[2] below
).
On a PC, the "Looks" director can be found at C:>Documents and Settings> Program Files>SPSS

Once inside the "Looks" folder (below), you should see various other "TableLooks" files (the files end in ".stt"). If you see that, you know you are in the right folder. From here, check to make sure your "File Name" is what you want it to be and then click "Save" ([1] below).

After you've clicked "Save", you should find yourself back in the "TableLooks" dialogue screen (below). Also, you should now see a newly available "TableLook" in the "TableLook Files:" area ([1] below) (the one you saved above). Next, simply click on that to highlight it (1] below) and then click the "OK" button ([2] below).

After clicking "OK", the "TableLooks" screen should disappear and the initial table you created should again be visible, but its format should now reflect the changes we've made and it should more closely resemble APA format (below)!

While certainly you could choose to do all of those steps for every graph you produce from now until forever, that wouldn't seem to be a very efficient use of your time. Instead, let's change the default SPSS settings to automatically use our newly created "TableLook" for all tables that are created in the future.
3) ADJUST SPSS TABLE "LOOK STYLE" SETTINGS (OPTIONS)
To adjust the SPSS "TableLook" settings, go to "Options" ([1] below), which you'll find under the "Edit" menu.

With the "Options" dialogue screen now visible, select the "Pivot Tables" tab ([1] below). Next, select our newly created "Table Look" (I called mine "APA table"; [2] below).
On a side note, I'd also suggest changing the "Copying wide tables to the clipboard in rich text format" option ([3] below) to "Shrink width to fit". Making this change will prevent SPSS from wrapping tables that are too wide for your page to another row (making them appear as two tables, even though they are really just two parts of the same table). I personally find that very irritating. Instead, this will tell SPSS to adjust the width of the cells in the table so that the table can fit within the margins of the page.
Finally, click on the "Apply" button ([4] below), followed by the "OK" button ([5] below). You should now be done and all future graphs should be produced in APA format (or closer to it anyway). Happy table making!

RIGHT-CLICK HERE AND "SAVE AS FILE" TO DOWNLOAD THE STT "LOOKS" FILE
Update
on 2011-06-08 20:45 by Jeremy Taylor
A few sharp readers have made a great point about this post: If you have a version of SPSS that is licensed by a University, the instructions may not work. Specifically, when you try to create a "new look", it will likely display an error message that says you don't have "access" to the directory (or something like that).
Thanks to one of our readers (Benjamin Telkamp), we have a solution! Benjamin discover that you can save the "new look" as one of the existing looks in SPSS (just pick one that you don't think you'll be needing). Thanks for the tip Benjamin!